
How to Measure a Small Patio Before Buying Outdoor Furniture
Measure the patio, obstacles, door swings, and delivery route; then compare exact product footprints with the extra space furniture needs in use.
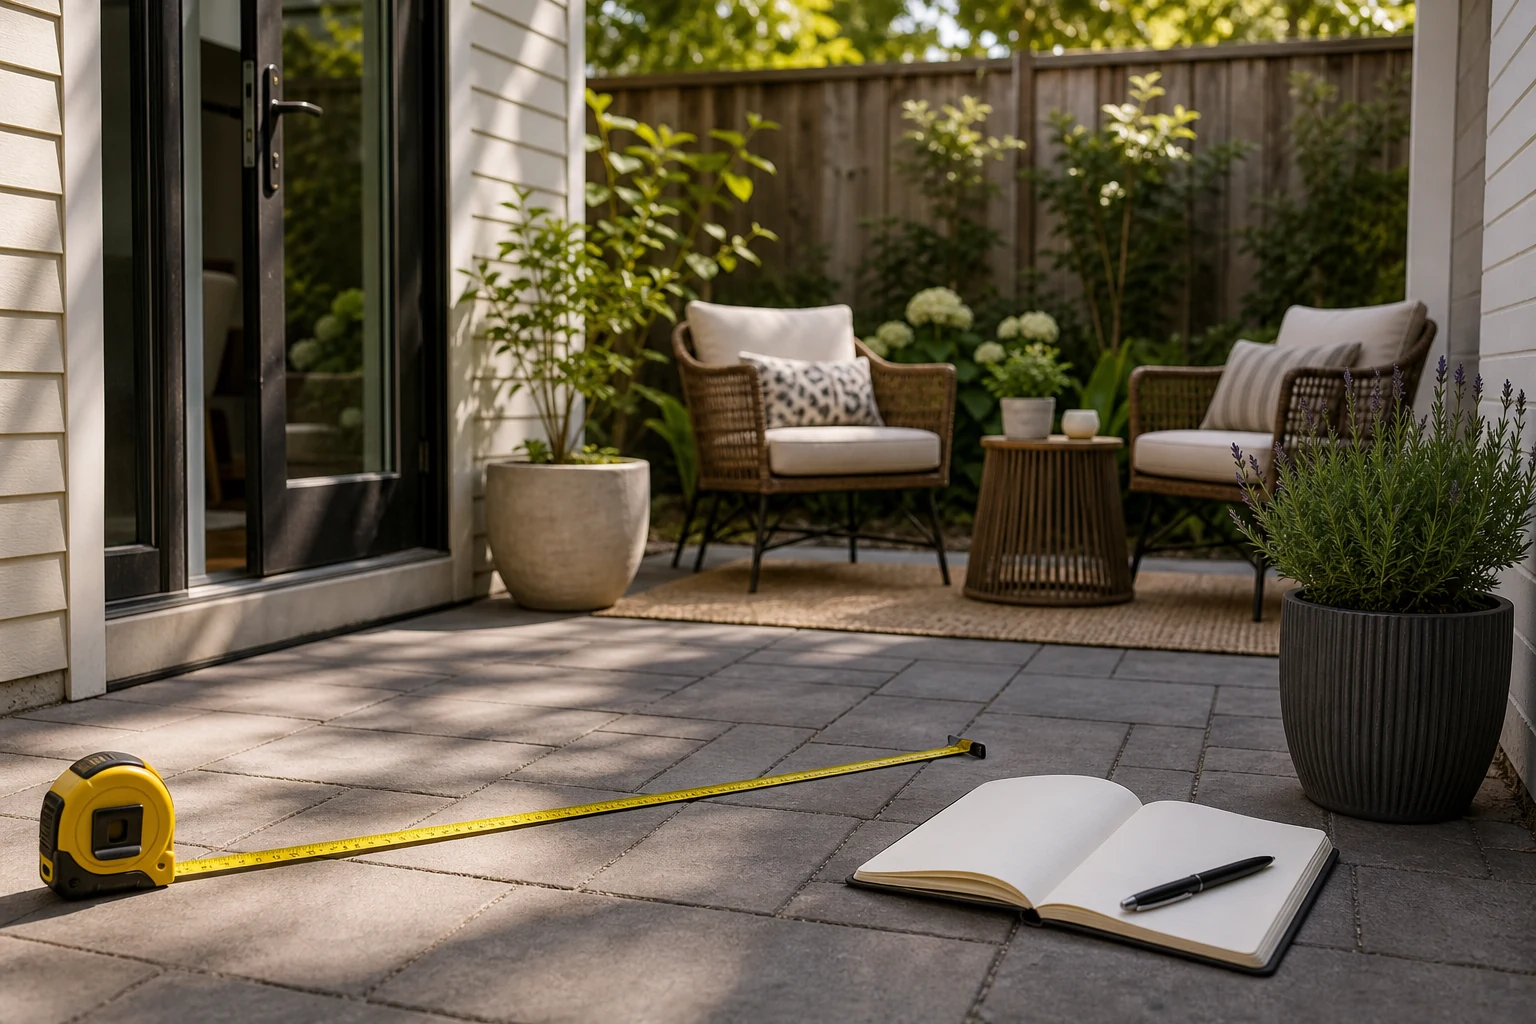
Measure the patio boundary, fixed features, door swings, and delivery route before comparing any furniture. Then test both the item's fixed footprint and the extra space it occupies while someone uses it. A total square-foot number alone cannot tell you whether a chair, table, or sofa will work.
Your plan should keep three measurements separate: the geometry of the patio, the exact dimensions of a product, and any comfort or clearance guidance you choose to test. That separation makes it easier to see what is measured fact, what is a planning choice, and what may require a local code or accessibility check.
1. Draw the patio from above
Start by deciding what the patio needs to support: dining, conversation, reading, storage, or a mix. IKEA's small-space guide recommends beginning with the activities you want to do; that decision tells you which furniture positions need the most attention. If the activity choice is still open, choose between upright dining and a lounge seat.
Draw a top-view outline as if you were looking straight down. Mark every straight edge, corner, step, angled section, and curve. Add the house wall, railings, fences, posts, planters, drains, outlets, utility equipment, and anything else that cannot move.
Write each measurement directly beside the line it describes and use one unit throughout the sketch. Recheck the outside edges, then measure the clear distance between obstacles rather than assuming the whole boundary is open.
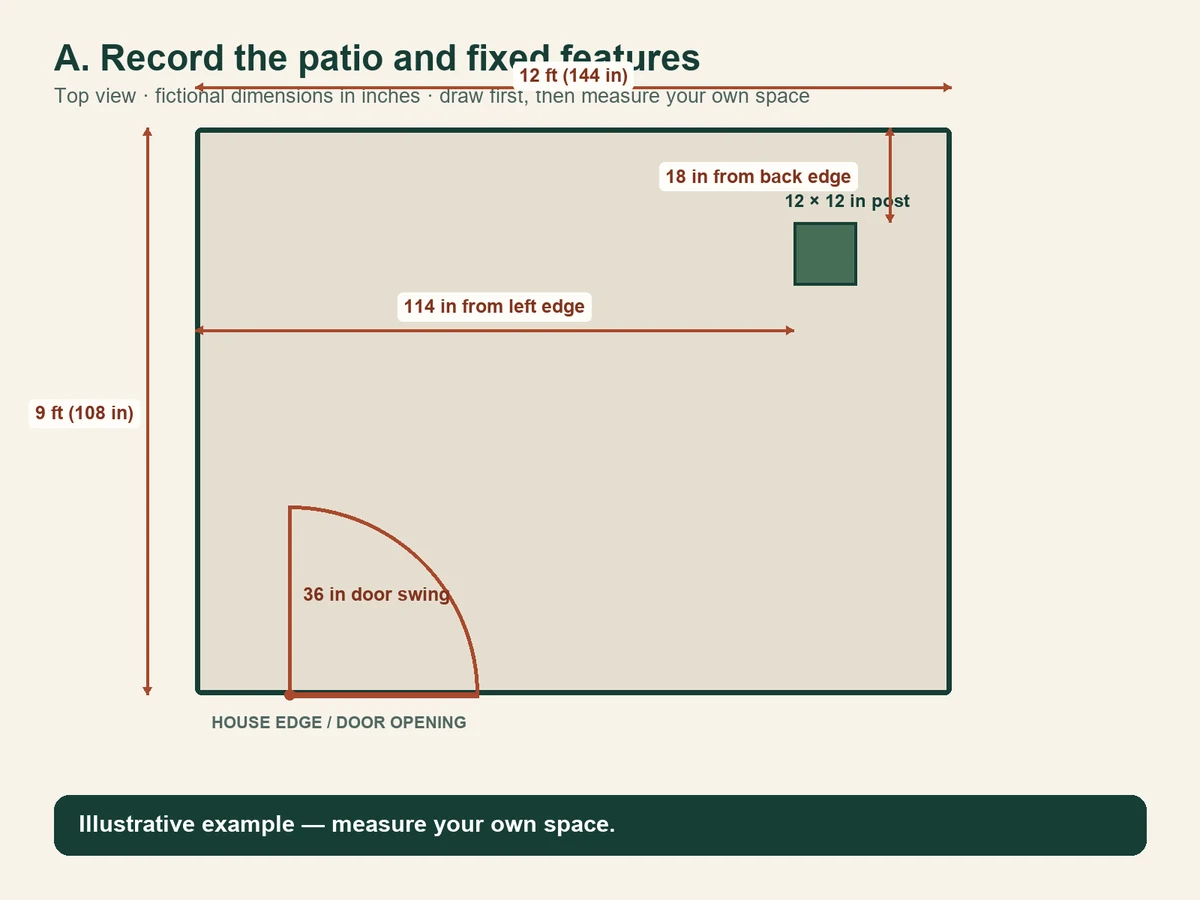
Show every door and gate in both the closed and fully open positions. Draw the swing arc, and record the clear opening. Locate each fixed obstacle from two nearby edges, then write its own width and depth. The first diagram is a fictional measurement example, not a plan to copy.
Measure the delivery route too
Trace the route from the delivery point to the final furniture position. Record the narrowest clear width and height, tight turns, steps, thresholds, gate hardware, railings, and overhead obstructions. If the item may arrive assembled, boxed, or in separate modules, compare the route with the dimensions for the form that will actually travel through it.
- Patio entrance or gate: clear width and height
- Narrowest point on the route: width and height
- Tightest turn: available width before and after the turn
- Steps and thresholds: height, depth, and landing space
- Final approach: remaining obstacles, door swings, and vertical clearance
2. Calculate total area without calling it usable area
For a rectangle, total area is length multiplied by width. Keep the original dimensions on the sketch so the area can be checked later. Total area describes the boundary; it does not subtract a post, protect a doorway, or reserve room to move a chair.
In the fictional diagram, the patio measures 12 feet by 9 feet, so its rectangular area is 108 square feet. The same example includes a 36-inch door swing and a 12-by-12-inch post. Those dimensions are invented for the example and must not be reused as recommendations.
Handle irregular shapes honestly
For an L-shaped or stepped patio made from straight, square corners, divide the outline into non-overlapping rectangles. Calculate each rectangle and add the results. Keep the divisions on the sketch so you can confirm that no section was counted twice.
For an angled or curved boundary, an inscribed rectangle can be a conservative furniture-planning zone, but it is not the exact area of the patio. Label it as a planning zone. If you need an exact area for construction, permitting, or materials, use the actual geometry or an appropriate site plan rather than substituting the rectangle.
3. Map usable zones instead of chasing one usable-area number
A small patio may have several disconnected usable zones. Shade the door swing, required access points, drainage access, and fixed obstacles on the sketch. What remains can be tested as furniture zones, but it should not automatically be treated as one continuous rectangle.
Keep the following notes beside the relevant zone:
- Clear width and depth between fixed features
- Door or gate swing boundary
- Access that must stay open
- Overhead height limits
- Surface changes or slopes that affect placement
- Exact product footprint being considered
- In-use movement zone measured during the mock-up
4. Separate furniture footprint from in-use space
The fixed footprint is the part of the floor occupied by the furniture itself. Use the product's maximum width and depth, including arms, reclining backs, projecting legs, or other parts that extend beyond the main frame.
In-use space is larger whenever a person pulls out a chair, reclines a back, opens a storage lid, extends a footrest, or walks behind the piece. Do not hide that space inside the product footprint. Mark it as a separate zone based on the exact product mechanism and a full-size mock-up.
Wayfair's retailer planning guide uses several different space-planning scenarios: at least 30 inches between seating pieces; 24 to 30 inches between seating and a wall or fence; 30 to 40 inches across a path in heavier-traffic areas; 24 inches across a path in lower-traffic areas; and about 3 feet around a dining table for chair movement. When you copy one of these commercial planning suggestions, write both endpoints on the sketch—for example, the nearest edges of two seating pieces, the outer seat edge and the wall, or the two boundaries of a furniture-free path. Do not turn any of them into a universal comfort standard, building code, or accessibility requirement. Test the applicable distance in your own layout. For a dining setup, calculate the full dining-chair footprint.
Worked fictional example
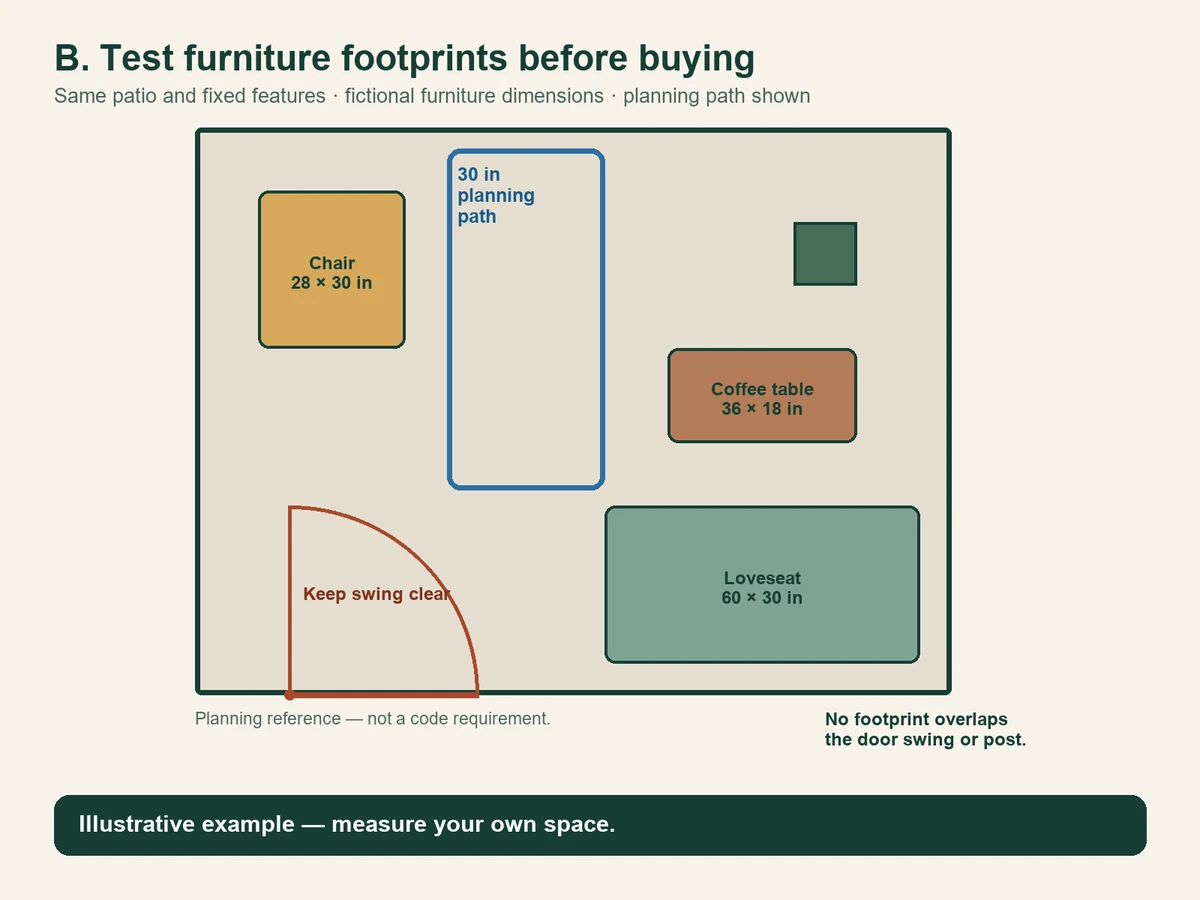
The second diagram uses the same fictional 12-by-9-foot patio. It shows a 28-by-30-inch chair, a 36-by-18-inch coffee table, and a 60-by-30-inch loveseat, plus a fictional 30-inch-wide planning path measured across the furniture-free band shown in the diagram. The three furniture rectangles total 22.83 square feet: 5.83 for the chair, 4.50 for the table, and 12.50 for the loveseat.
That 22.83-square-foot sum is only the non-overlapping fixed furniture footprint shown. It does not prove that the remaining 85.17 square feet is usable: the door swing, post, planning path, reach space, and positions of people still matter. The diagram is an illustrative layout comparison, not a tested product arrangement or a code-compliant plan.
5. Simulate the layout at full size
Use painter's tape, removable chalk, cardboard, or paper to mark each proposed footprint on the actual patio. Wayfair's planning guide specifically recommends a tape or chalk mock-up to visualize how much furniture the patio can hold and which dimensions fit.
Move through the mock-up as you expect to use the space. Open every door and gate, pull chairs out, approach the table, open storage, and carry a box along the delivery path. If a function is blocked, revise the layout or choose a smaller or differently shaped piece before ordering. For a compact worked example, compare two measured 6-by-8 patio layouts.
- Keep the door and gate swings visible during the test
- Mark the product footprint from its maximum dimensions
- Add a separate in-use zone for moving parts and people
- Walk the delivery route with the corners and turns in mind
- Photograph or date the final taped plan for comparison while shopping
6. Compare exact product dimensions
Use the dimensions on the exact product page or manufacturer specification, not labels such as small sofa or compact set. A Wayfair guide about furniture covers describes width, depth, and height for seating and diameter plus height for round tables. That page supports which object dimensions to record; it does not establish room-clearance rules.
Check whether listed dimensions describe the assembled item, shipping carton, separate modules, or all three. If packaging dimensions are unavailable and the delivery route is tight, ask the seller before purchase instead of assuming the assembled footprint will pass through the entrance.
- Product width, depth, and height at the widest points
- Diameter for a round table or accessory
- Dimensions with leaves, footrests, lids, or reclining parts open
- Chair position when tucked in and when pulled out for use
- Boxed or module dimensions for the delivery route
- Weight only if it affects how the item can be moved safely
Copyable patio measurement worksheet
Copy these labels into a note or print them with your sketch. Keep all measurements in the same unit.
- Primary use of the patio:
- Overall boundary dimensions:
- Total area calculation and shape used:
- Irregular sections and how they were divided:
- Doors and gates: opening width, height, and swing:
- Fixed obstacles: size and offsets from nearby edges:
- Clear furniture zones: width and depth:
- Delivery route: narrowest width, height, steps, and turns:
- Product name and exact model:
- Assembled width, depth, and height:
- Open or extended dimensions:
- Boxed or module dimensions:
- Fixed furniture footprint:
- In-use zones tested at full size:
- Comfort guidance selected for comparison and its source:
- Regulatory or accessibility question to verify locally:
- Final taped layout date:
Keep geometry, comfort guidance, and rules separate
Geometry is what you measured or calculated: boundary lengths, obstacle offsets, product dimensions, and areas derived from them. Record the inputs so someone else can reproduce the calculation.
Comfort guidance is a planning reference. The clearance figures above come from a retailer guide and may be useful for comparison, but your body dimensions, furniture mechanics, traffic pattern, and intended activity can change what feels workable.
Regulatory and accessibility requirements are a separate check. A taped layout and retailer guidance cannot determine whether a required route, exit, railing, utility access, or accessible feature complies with rules that apply to your property. When that issue is relevant, verify the applicable local requirements or ask a qualified professional before treating the plan as compliant.
Final pre-purchase checklist
- I chose the main activity the patio needs to support.
- My sketch shows every edge, opening, swing, step, and fixed obstacle.
- I recorded clear dimensions between obstacles, not only the outside boundary.
- I measured the complete delivery route, including its narrowest point and turns.
- I kept total area, fixed furniture footprints, and in-use zones separate.
- I checked the exact product and package or module dimensions available from the seller.
- I marked the proposed layout at full size and tested doors, moving parts, and normal use.
- I treated retailer clearance figures as planning guidance rather than universal rules.
- I identified any local code, exit, accessibility, or utility-access question that needs separate verification.
- I saved the dated sketch and measurements for my editorial or purchase review.
Sources
References retained with this exact revision.
- How to Furnish a Smaller Outdoor SpaceAccessed September 17, 2026
- How to Measure for Outdoor Furniture CoversAccessed September 17, 2026
- How to Plan Your Patio Seating SpaceAccessed September 17, 2026